Step by Step, define vCenter customization spec with vRealize Automation 7.x Event Broker
The Event Broker is a great new feature in vRealize Automation 7.x. In this post we’ll show you, step by step, how to define which vCenter customization specification must be applied to a Virtual Machine based on specific conditions.
This article covers:
- How to create an event-broker subscription
- Set conditions to the subscription
- Set a condition based on a custom property
- Show payload info in vRealize Orchestrator
- Get data from payload
- Get tenant name from environment variable
- Update a Virtual Machine custom property
Scenario
We have several Customization Specs defined in vCenter (don’t ask me why) that must be applied to some Virtual Machines depending on information from a Custom Property and the Tenant name.
Create the Workflow in vRealize Orchestrator
The subscription will execute a vRealize Orchestrator Workflow so we must to create it first. Lets start with a very simple version and then we will add more attributes later.
Create a new Workflows called “Set Customization Spec” with only one “Input Parameter” called “payload” with type “Properties“. The name of the parameter is very important, otherwise this wont work.
Go to the “Schema” tab, add a “Script Task” and name it “payload info” and set the payload as an Input Parameter of the script. To show the information from the payload, add the following code to the script:
function printProperties(props, depth) {
depth = (depth)?depth:0;
var indent = Array(depth*5).join(".");
for each (var p in props.keys) {
var propValue = props.get(p);
if (System.getObjectType(propValue)=='Properties') {
System.log(indent + p);
printProperties(propValue, depth+1);
} else {
System.log(indent + p + ': ' + propValue);
}
}
}
printProperties(payload);

Creating the subscription
- In vRealize Automation, go to Administration tab -> Events -> Subscriptions and create a new subscription.
In “event topic” select “Machine Provisioning”. The schema on the right side of the screen represents the data that the “payload” could have. Click next. - In “Conditions” tab let the option “Run for all events” selected for now. Click next.
- On “Details” tab set the name of the subscription and check “Blocking” option. This is very important. If a subscription is “non blocking”, vRealize Automation will call the workflow in an async way and moves on. The rest of the process will not be affected by the result of the workflow. If a subscription is “blocking”, vRealize Automation will wait until the workflow finishes his execution. Then vRA will search for the output of the workflow to modify the Virtual Machine Entity. This option cannot be edited once the subscription is created.
Once you check the “Blocking” option you can set the time out. Put this option in 1 minute (or what you think is needed for the workflow to complete the execution). Click finish. - Publish the subscription
Test the subscription
Deploy a Virtual Machine blueprint to see the workflow execution. If everything is OK, you will see a lot of executions, one for each event in the “Machine Provisioning” process.
If we check the execution log tab, we’ll see something like this:

Notice that there is no much data in the payload. This is because vRealize Automation doesn’t send all available information unless we explicitly ask for it.
Each event has a state (name of the event) and a phase (PRE, EVENT, POST). We need to decide in which state and phase we want to execute our workflow to set the name of the Customization Spec.
In this case we choose the state “VMPSMasterWorkflow32.BuildingMachine” and phase “PRE” so we need to tell vRA to send all information for that state. To do this, we need to add a Custom Property to the blueprint with name “Extensibility.Lifecycle.Properties.VMPSMasterWorkflow32.BuildingMachine” and value “*“.
Deploy the Virtual Machine again and you will notice that in the workflow run corresponding to “VMPSMasterWorkflow32.BuildingMachine” there is much more information than in the others. We can see the Virtual Machine custom properties now.
Define a custom property with the needed info
At the beginning of this article we said that we will use a value in a Custom Property to define the Customization Spec name. We need to add that Custom Property in the VM component of the blueprint. Lets call the property “mycompany.vm.customspec.info” and the value could be something like “some value“.

Establish subscription conditions
Go to Administration tab -> Events -> Subscriptions, edit your subscription and in the Conditions tab, select “Run based on conditions”.
We have four conditions so, in “Clause” select “All of the following”. This means that all the following conditions must be accomplished to run the workflow.
In the new “Clause”, select Data/Lifecycle state/Lifecycle state name, Equals, “VMPSMasterWorkflow32.BuildingMachine“.
Click on “Add Expression”, Clause = Data/Lifecycle state/Lifecycle state/State phase, Equals, PRE.
Click on “Add Expression”, Clause = Data/Machine/Machine type, Equals, “Virtual Machine“.
Click on “Add Expression”. In the Clause dropdown, just below “Not the following” there is a text box. In this textbox write exactly the following: ${data~machine~properties~mycompany.vm.customspec.info} and click on the green button. Notice that the first part (data~machine~properties~) points to custom properties, and the last part (mycompany.vm.customspec.info) is the name of our custom property. If you change the name of the custom property, you need to change only the last part. Select “Does not equal” and let the last box emtpy. This means that in order to this subscription to be fired, the blueprint must have this custom property with a non empty value.

Click finish
Test our subscription again
Deploy the Virtual Machine one more time. Hopefully, the workflow is executed only once now. If we check the execution log tab, we’ll see something like this:

We can see our custom property there!
If we look at the Variables tab we will see more information, we are interested on the tenant name:

Defining the Customization Spec name
In order to get the information we’ve stored in the custom property and the tenant name, we add a new Script Task, set payload as an input parameter and two output parameters: “customspecInfo” and “tenantName” both of type String.
The code is the following:
customspecInfo = payload.get("machine").get("properties").get("mycompany.vm.customspec.info");
tenantName = System.getContext().getParameter("__asd_tenantRef");

Add a new custom script to define the customization spec name. I’m not iterested in this code right now, but let’s say that has an output parameter called “CustomSpecName” of type String.
Sending data back to vRealize Automation
When a subsription is set to “Blocking”, vRA looks for an output parameter called “virtualMachineAddOrUpdateProperties” of type “Properties“. Any property in this parameter will be used by vRealize Automation to update the Virtual Machine entity. Go to the Output tab of the Workflow and add that output parameter
Go back to the Schema tab and add a new Custom Script, set “CustomSpecName” as input parameter and “virtualMachineAddOrUpdateProperties” as an output parameter. Put the following code on it:
var MyProperties = new Properties();
MyProperties.put('CloneSpec', CustomSpecName);
virtualMachineAddOrUpdateProperties = MyProperties;

Final test
Deploy the Virtual Machine one last time. The Customization Specification must be applied to the Virtual Machine.
Let us know if you have any comment or question about vRealize Automation 7.x event-broker.
La ruta con Flex CUDs en GCVE
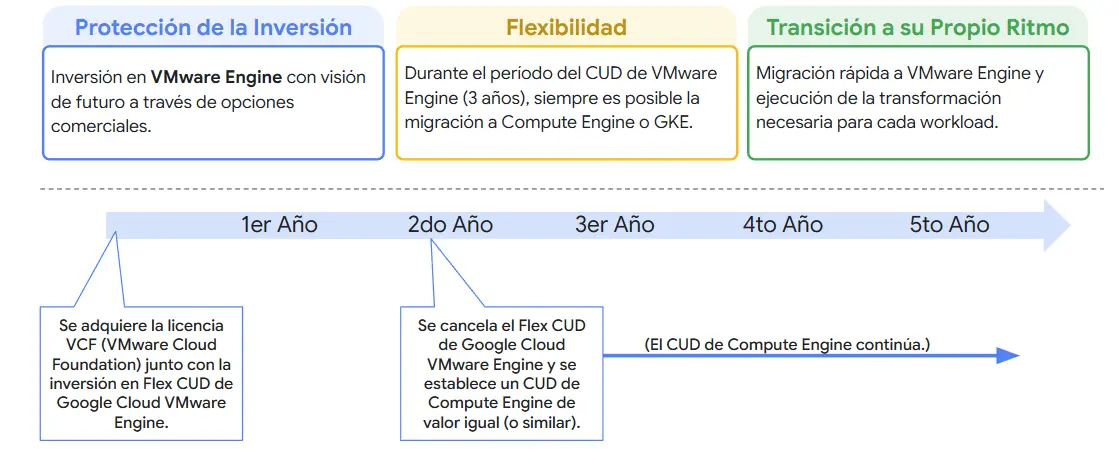
Siguiendo la captura anterior, tu inversión en los nodos de GCVE queda protegida durante todo el ciclo. Si en el segundo año decidís migrar una carga de VMware hacia Compute Engine (GCE) o GKE, podés cancelar el CUD de GCVE y transferir su valor remanente para establecer un nuevo CUD equivalente en GCE o GKE.
Esto te permite mantener el descuento, conservar el ahorro y acompañar la evolución de tus workloads, reflejando de manera precisa el enfoque de Lift, Run & Transform.
Conectividad Nativa: El Primer Paso hacia PaaS
Como mencioné antes, uno de los errores más comunes es ver GCVE como un silo. Su verdadero valor está en su conectividad nativa de baja latencia con el ecosistema de Google Cloud. Una vez que tu entorno VMware está en GCVE, tus aplicaciones heredadas están literalmente a milímetros de consumir servicios nativos de Google.
No aprovechar estos servicios nativos representa una pérdida del TCO real de la infraestructura. Por eso es fundamental utilizar el tiempo que GCVE ofrece para ser estratégicos con cada aplicación y planificar qué workloads pueden modernizarse sin disrupción.
Desde Wetcom hacemos especial foco en identificar el consumo base para dimensionar Flex CUDs con precisión, asegurando ahorro en todo el cómputo y habilitando una transición ordenada hacia otros servicios cuando tenga sentido.
Algunos ejemplos de caminos posibles y que podemos probar con PoCs sin disrupción incluyen:
- Hacia Google Compute Engine (GCE): Ideal para workloads que pueden beneficiarse de familias de máquinas especializadas, incluidas instancias con GPU o TPU.
- Hacia servicios PaaS de Bases de Datos: Como Cloud SQL, AlloyDB o Cloud Spanner. Muchas de estas transiciones se logran de manera transparente utilizando el servicio nativo Database Migration Service (DMS) para migraciones homogéneas. Esto libera la carga operativa de los DBAs delegando la responsabilidad a Google.
Un dato de valor, la posibilidad de probar bases de datos como las que mencione y sin disrupción es un gran beneficio, ya que al tener baja latencia entre GCVE y el servicio nativo, las pruebas de concepto no impactan el servicio de producción. - Hacia Contenedores (Cloud Run / GKE): GCVE facilita identificar qué VMs son candidatas naturales para avanzar hacia modelos cloud-native cuando llegue el momento.
Seguridad Nativa y Mitigación de Riesgos
Y no nos limitemos únicamente en la modernización de nuestras aplicaciones. La preocupación por la seguridad en la nube es natural, y en Google Cloud se aborda con un enfoque de “menor privilegio” y “guardrails” claros.
- La interconexión de GCVE con el VPC del cliente permite configurar micro-firewalls granulares, garantizando que solo los puertos y servicios estrictamente necesarios estén abiertos.
- Servicios como Cloud Armor, Next Generation Firewall (NGFW) y Security Command Center (SCC) ofrecen una batería de protección y análisis. SCC, en particular, analiza la infraestructura y alerta sobre riesgos, ofreciendo una guía de best practices para mitigar vulnerabilidades como ataques de ransomware.
- Y algo fundamental: establecer un Foundation adecuado desde el inicio, definiendo límites, permisos y controles por perfil de usuario, para evitar configuraciones riesgosas o costos inesperados. Desde Wetcom podemos acompañarlos en este diseño.
Pero mejor, veamos esta gráfica que resume claramente el recorrido que estamos describiendo:
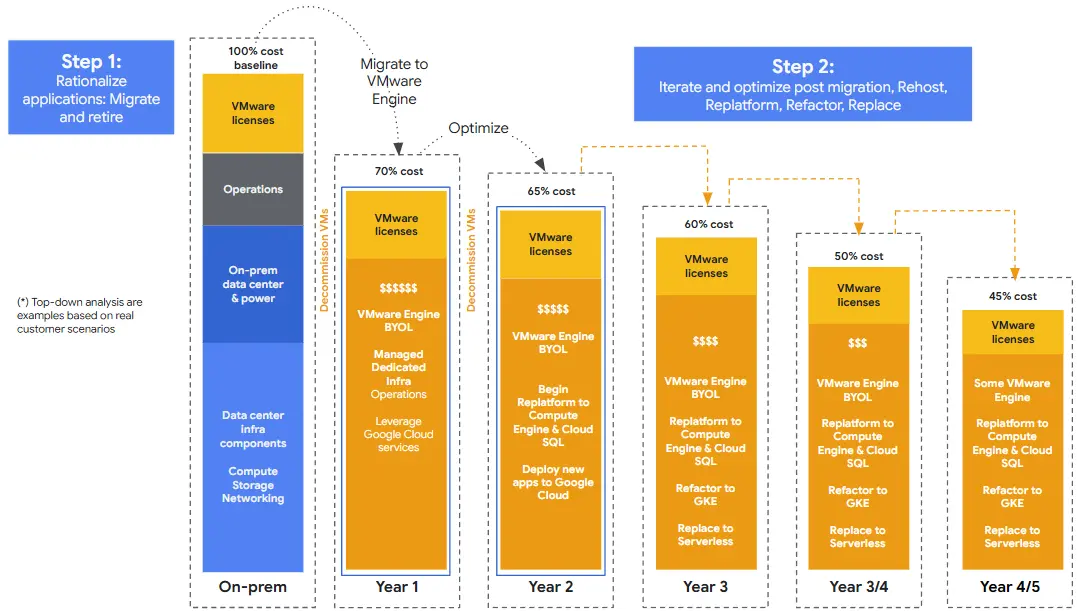
Esta gráfica de Google Cloud resume la hoja de ruta que podemos diseñar, mostrando cómo se pasa de un costo base del 100% on-premise a aproximadamente un 45% del costo original en el quinto año. Lo interesante es que este ahorro puede sostenerse —y amplificarse— gracias a los Flex CUDs, que permiten transicionar el compromiso a distintos servicios de cómputo a medida que avanzamos con el Replatform & Refactor hacia servicios como GCE o GKE. Esto habilita liberar nodos de GCVE y reducir, de forma progresiva, parte del licenciamiento de VMware que quedaría en desuso.
El resultado final es un entorno híbrido optimizado:
- GCVE para aquellas aplicaciones legacy que necesitan seguir ejecutándose allí, a milímetros de los servicios nativos de Google.
- Y el resto de las aplicaciones ya modernizadas sobre GCE, GKE o bases de datos como servicio, aprovechando todo el potencial de la nube.
El proceso puede requerir tiempo para determinadas cargas de trabajo, pero el impacto acumulado habilita un aprovechamiento total del TCO de tu infraestructura con el correr de los años.
Inversión Inteligente, Futuro Asegurado
La elección de GCVE no es un compromiso con la tecnología de ayer, sino una decisión inteligente de migración. Te permite resolver la urgencia del presente mientras habilitás el futuro de la modernización, con la flexibilidad financiera que ofrecen los Flex CUDs.
Si te quedaste con ganas de indagar un poco más sobre hacia dónde podrías transicionar tus cargas de trabajo en GCP, te recomiendo este episodio de nuestros #InsanePodcasts, donde contamos distintos escenarios posibles:Google Cloud VMware Engine: Cómo evitar la fatiga tecnológica
¿Buscás una estrategia segura para evolucionar tu entorno VMware?
Desde Wetcom podemos acompañarte con un Cloud Assessment 100% bonificado para evaluar tu entorno VMware (o de otra nube) y diseñar una Hoja de Ruta hacia la modernización progresiva.
¿Migrando a GCVE? También te ayudamos con la cotización de licencias y nodos.